There is something a little dangerous about a dessert that combines the creamy richness of cheesecake with the buttery charm of a tart shell.
It sounds innocent enough.
A neat little tart.
A tidy little portion.
A cute bakery-style bite.
And then suddenly you have had two, maybe three, and you are standing in the kitchen pretending you are just checking the texture one more time.
That is exactly the kind of dessert these cheesecake tarts are.
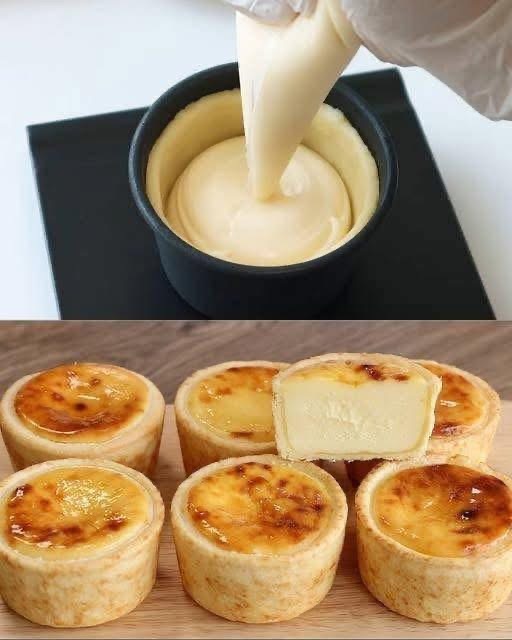
They have that crisp golden shell, the smooth creamy center, and the lightly browned top that makes them look like they came straight from a pastry shop window. They are rich without being too heavy, elegant without being fussy, and simple enough to make at home if you take your time and enjoy the process.
If you love cheesecake, mini tarts, cream cheese desserts, or homemade pastries that look much fancier than they really are, this recipe absolutely deserves a spot in your collection.
Why Cheesecake Tarts Are So Irresistible
A full cheesecake is wonderful.
A tart is wonderful too.
But when you combine the two, something especially good happens.
You get the creamy, tangy, sweet center that makes cheesecake so loved.
Then you add that buttery tart crust underneath, which gives every bite a little structure and a little crunch.
That contrast is everything.
It is what turns a nice dessert into the kind of dessert people remember.
The shell keeps the filling from feeling too soft.
The filling keeps the tart from feeling dry.
And the little browned top adds that bakery-style finish that makes them look polished and homemade at the same time.
That is a very attractive combination.
What These Tarts Taste Like
These cream cheese tarts are rich, smooth, lightly sweet, and deeply satisfying.
The crust is buttery and tender with just enough firmness to hold its shape.
The filling is creamy, silky, and full of classic cheesecake flavor.
And once the tops bake into that glossy golden finish, the whole dessert feels elegant in a way that is somehow still very cozy.
They taste a little like mini cheesecakes.
A little like custard tarts.
And a little like the kind of dessert someone brings out with coffee and suddenly everybody starts acting very interested in dessert again.
Very understandable behavior.
The Beauty of a Small Tart
One of the nicest things about mini cheesecake tarts is that they feel special right away.
You do not have to slice anything.
You do not have to worry about neat portions.
You do not have to pretend one enormous slice is “just a little.”
Each tart is already its own perfect serving.
That makes them wonderful for gatherings, holidays, tea tables, dessert trays, birthdays, or those weekends when you want to bake something pretty without committing to a huge layered cake and the emotional journey that comes with it.
They also store beautifully, which makes them even more lovable.
Ingredients
For the tart dough
- 230 g cake flour
- 15 g granulated sugar
- 2.5 g salt
- 135 g unsalted butter, cold and cubed
- 50 g ice-cold water
For the cheesecake filling
- 400 g Philadelphia cream cheese, room temperature
- 20 g cornstarch
- 130 g granulated sugar
- 140 g beaten egg, about 3 large eggs
- 100 ml heavy cream
- 1 teaspoon vanilla extract
- 1 tablespoon lemon juice, optional
The lemon juice is optional, but it gives the filling a slight brightness that works beautifully with the cream cheese.
Start With the Tart Dough
In a mixing bowl, combine the cake flour, sugar, and salt.
Add the cold cubed butter and work it into the flour using your fingertips or a pastry cutter until the mixture looks crumbly.
You want little bits of butter throughout.
That is one of the things that helps create that tender tart shell later.
Now add the ice-cold water little by little and mix just until the dough comes together.
Do not overwork it.
Tart dough likes a calm, respectful attitude.
Once the dough holds together, shape it into a flat disc, wrap it, and chill it for about 30 minutes.
That chilling time helps the dough relax and makes it easier to roll.
Also, cold dough is simply less dramatic.
Shape the Tart Shells
Once chilled, roll the dough out on a lightly floured surface.
Cut circles large enough to fit into your tart molds or muffin pan wells.
Press the dough gently into the molds and trim any extra from the top.
Use a fork to prick the bottoms lightly.
This helps keep the shells from puffing up too much.
At this stage, they already start looking very promising.
Like tiny edible cups waiting for something excellent to happen.
And that is exactly what is about to happen.
Make the Cheesecake Filling
In a large bowl, beat the room-temperature cream cheese until smooth.
That part matters.
If the cream cheese is still cold and lumpy, the filling will fight back.
And nobody needs that.
Once smooth, add the cornstarch and sugar.
Beat again until creamy.
Now slowly add the beaten eggs, mixing gently as you go.
Then add the heavy cream, vanilla extract, and lemon juice if using.
Mix until silky and smooth.
The filling should be creamy, pourable, and free of lumps.
At this point it already looks like something very good is on the way.
Fill and Bake
Preheat your oven to 325°F (160°C).
Fill each tart shell with the cheesecake mixture, leaving a little room at the top so it does not overflow while baking.
Bake for about 25 to 30 minutes, depending on the size of your tart shells.
The filling should look mostly set with just a very slight wobble in the center.
If you want that classic browned top like in the picture, you can increase the heat slightly at the end or briefly broil them very carefully for a minute or two.
Very carefully.
That top can go from golden and beautiful to deeply regrettable in record time.
Let the tarts cool completely, then chill them before serving for the best texture.
Why Chilling Matters
Warm cheesecake tart is nice.
Chilled cheesecake tart is better.
That cooling time helps the filling firm up, settle, and develop that smooth creamy texture people expect from a really good cheesecake dessert.
It also makes the tart shell easier to bite into cleanly.
And if presentation matters, chilled tarts definitely look neater and more polished.
So yes, waiting is annoying.
But in this case, waiting is useful.
Tips for the Best Cheesecake Tarts
Use room-temperature cream cheese.
Chill the dough before rolling it.
Do not overmix once the eggs go in.
Bake until just set, not dry.
And cool the tarts fully before serving.
If you want especially smooth filling, strain it through a fine sieve before pouring it into the shells.
That step is not required, but it does make the filling extra silky.
Very fancy behavior.
Very satisfying.
Easy Variations
Once you know the basic method, these homemade cheesecake tarts are easy to personalize.
You can add a little lemon zest for a brighter version.
You can top them with fresh berries.
You can drizzle them with caramel or melted chocolate.
You can add a spoonful of fruit jam under the filling.
Or you can leave them plain and let that creamy center and golden top do all the work.
Honestly, plain is already excellent.
The best recipes do not always need a lot of decoration.
Sometimes they already know exactly who they are.
Perfect for Sharing
These tarts are especially good for serving to other people because they look impressive without being difficult to eat.
No messy slicing.
No collapsing layers.
No cake server panic.
Just one perfect little tart at a time.
That makes them ideal for parties, family visits, holidays, birthdays, and coffee tables where people want dessert that feels special but still easy.
And yes, they also make it much easier to say, “I only had one.”
Even when that one had friends.
Final Thoughts
These cheesecake tarts are one of those desserts that feel elegant, comforting, and completely worth making.
They bring together a buttery tart shell and a creamy cheesecake filling in the most convincing way possible.
They look bakery-worthy.
They taste rich and smooth.
And they have exactly the kind of homemade charm that makes people ask where you bought them before realizing you made them yourself.
Which, honestly, is one of the nicest compliments a dessert can get.