There is something about a loaf of fresh homemade bread that changes the whole mood in a kitchen.
The smell alone is enough to make people suddenly appear from every room in the house asking, “Is that ready yet?”
And when the crust comes out golden, the inside stays soft and fluffy, and the first slice is still just a little warm, it becomes very easy to understand why good bread never really goes out of style.
This homemade bread is exactly that kind of recipe.
It has a beautiful crust.
It has a tender, airy middle.
And it gives you the kind of loaf that makes people tear off pieces before the bread has even had the chance to cool properly.
If your mother-in-law said it was the best homemade bread she had seen in years, honestly, that sounds believable.
Because this kind of bread has real presence.
It looks rustic and comforting, tastes better than most store-bought loaves, and brings that quiet little pride that only homemade bread seems to bring.
It is simple food.
But it never feels small.
Why Homemade Bread Still Wins
Bread is one of those things people often buy out of habit.
It is easy.
It is already there.
And usually it is “good enough.”
Then somebody makes a real homemade loaf, and suddenly the whole comparison feels unfair.
Fresh bread has texture.
It has life.
It has that crisp outside and soft center that packaged bread rarely captures.
And beyond the flavor, there is something deeply satisfying about turning flour, water, yeast, and time into something this good.
It feels useful.
It feels comforting.
And it makes the kitchen smell like you have your life together even if everything else around you says otherwise.
That is part of the magic too.
What Makes This Bread So Good
A really good homemade bread does not need a lot of complicated ingredients.
It needs balance.
The dough has to be soft enough to rise well but structured enough to hold shape.
The crust has to brown nicely without turning too hard.
And the middle has to stay tender, airy, and easy to pull apart.
That is why this recipe works.
It gives you the kind of dough that feels alive in your hands.
It rises beautifully.
It bakes into a loaf with color and character.
And once sliced, it has that soft fluffy crumb people always hope for when they make bread at home.
That is the moment the whole recipe pays you back.
Ingredients
For the dough
- 4 cups all-purpose flour or bread flour
- 2 1/4 teaspoons instant yeast
- 1 1/2 teaspoons salt
- 1 tablespoon sugar
- 1 1/2 cups warm water
- 2 tablespoons olive oil or melted butter
Optional
- extra flour for dusting
- a little cornmeal or semolina for the tray
- melted butter for brushing after baking
This is a simple base, which is exactly what makes it so useful.
You can keep it rustic and plain, or later you can add herbs, garlic, cheese, or seeds if you want a variation.
But the basic version already does everything a good loaf should do.
Start with the Dough
In a large bowl, combine the flour, yeast, salt, and sugar.
Stir everything together so the dry ingredients are evenly spread.
Now add the warm water and olive oil.
Mix with a spoon or your hand until a shaggy dough forms.
It may look rough at first.
That is normal.
Bread dough often starts out looking a little uncertain before it becomes beautiful.
Once the dough comes together, move it onto a lightly floured surface and knead it for about 8 to 10 minutes.
You want the dough to become smoother, softer, and slightly elastic.
If it feels too sticky, add a little flour, but not too much.
A softer dough usually gives a softer loaf.
That matters here.
You do not want a stiff dough unless you are trying to create disappointment on purpose.
First Rise
Place the dough into a lightly greased bowl.
Cover it with a clean towel or plastic wrap and let it rise in a warm place for about 1 to 1 1/2 hours, or until doubled in size.
This is the quiet stage.
The part where the dough goes from “just mixed” to something that actually starts looking promising.
It should puff up nicely and feel airy when you touch it gently.
If your kitchen is cool, it may take a little longer.
That is fine.
Bread has its own schedule sometimes.
Very confident behavior.
Shape the Loaves
Once the dough has risen, punch it down gently.
Not aggressively.
Just enough to release the extra air.
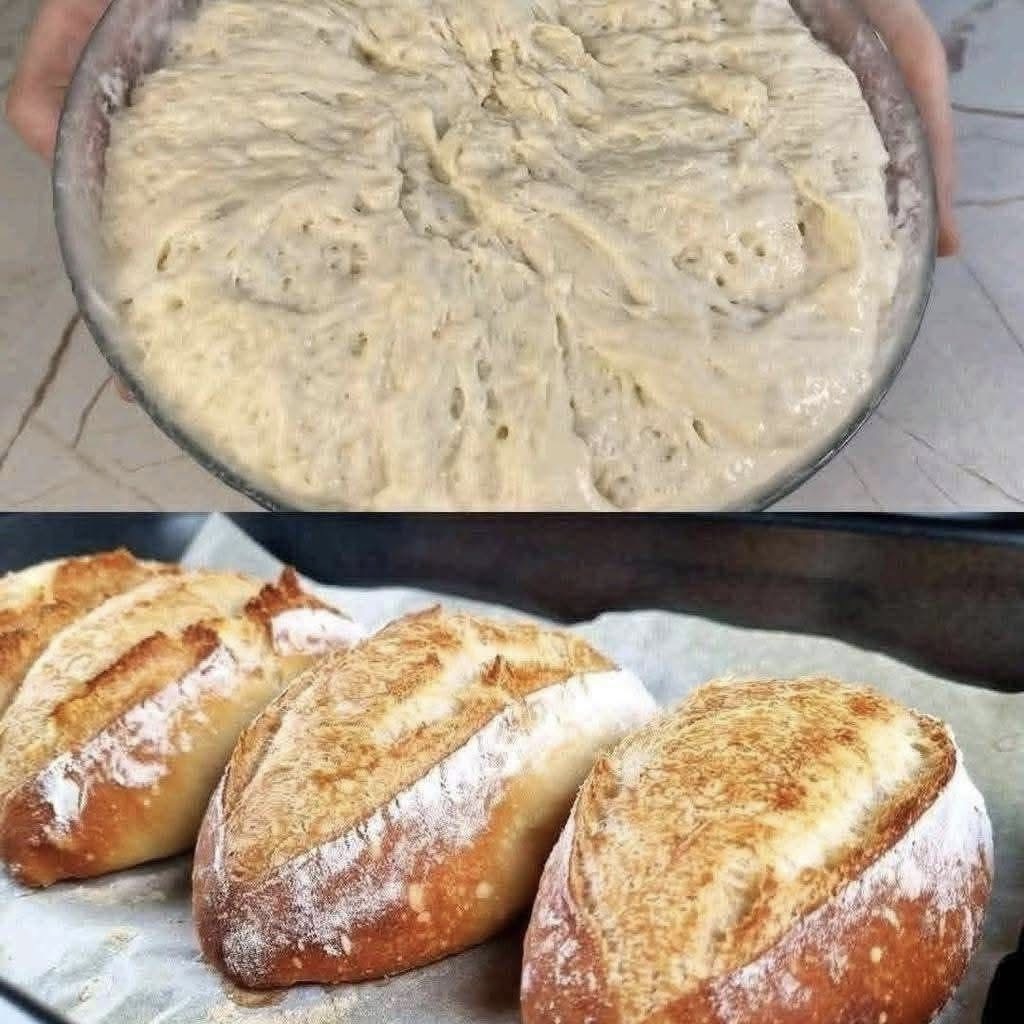
Now divide the dough into smaller portions if you want several rustic rolls like the picture, or keep it as one loaf if you prefer a larger shape.
Shape each piece into an oval or round loaf by folding the dough inward and tightening the surface slightly.
Place the shaped dough onto a parchment-lined tray.
Dust the tops lightly with flour.
If you want that lovely bakery-style split on top, use a sharp knife or bread lame to make one quick slash down the center of each loaf.
That little cut helps the bread expand nicely in the oven and gives it that classic rustic look.
Second Rise
Cover the shaped loaves loosely and let them rise again for about 30 to 40 minutes.
This second rise helps create that softer, fuller crumb inside.
Do not skip it unless you enjoy bread that feels a little too eager to stay dense.
A second rise is worth the wait.
Very worth it.
Bake Until Golden
Preheat your oven to 425°F (220°C).
If you want an extra nice crust, place a small oven-safe dish of hot water in the oven during baking.
That bit of steam helps the crust develop beautifully.
Bake the loaves for about 20 to 25 minutes if making smaller rolls, or 30 to 35 minutes for a larger loaf.
The tops should turn golden brown and sound a little hollow when tapped underneath.
That is how you know the bread is ready.
If you want a softer finish, brush the tops lightly with melted butter after baking.
If you want to keep the crust more rustic, leave them plain.
Both are good.
Very good.
What It Tastes Like
This homemade bread has everything people want from a real loaf.
The crust is golden and lightly crisp.
The inside is soft, airy, and fluffy.
It tears beautifully.
It slices beautifully.
And it tastes rich and comforting in that very simple way bread is supposed to taste.
Nothing flashy.
Nothing complicated.
Just honest, warm, fresh bread that makes butter melt immediately and disappear even faster.
Best Ways to Serve It
This bread is wonderful on its own.
But it is especially good with:
- butter
- jam
- soup
- cheese
- olive oil
- eggs
- roasted meat
- sandwiches
Or just tear it apart while it is still warm and stand there in the kitchen pretending you are only checking the texture.
That also counts.
Tips for the Best Homemade Bread
Use warm water, not hot water, so the yeast stays active.
Do not add too much flour too quickly while kneading.
Let the dough rise fully both times.
Slash the top for a nicer shape and better expansion.
And let the bread cool at least a little before slicing, even though that advice is often emotionally difficult to follow.
A short rest helps the crumb settle and makes the bread slice better.
Though warm torn pieces are still a wonderful decision.
Final Thoughts
This homemade bread is one of those recipes that reminds people why baking from scratch still matters.
It fills the kitchen with that incredible smell.
It comes out with a beautiful golden crust.
And it gives you a soft fluffy middle that makes the first bite feel immediately worth the effort.
It is simple.
It is comforting.
And it has exactly the kind of homemade goodness that makes people reach for another slice before the first one is even finished.
Which, honestly, is exactly what great bread should do.