There is something almost magical about a loaf of bread that rises beautifully in the pan, bakes up golden and glossy, and slices into the kind of soft, fluffy pieces that make store-bought bread suddenly feel a little suspicious. This Fluffy Homemade Sandwich Bread is exactly that kind of recipe. It is soft, rich, tender, and wonderfully simple once you understand the steps.
What makes this bread so special is the texture. It rises high, stays soft, and has that light, airy crumb that makes it perfect for toast, sandwiches, jam, butter, or just tearing off a warm piece while standing in the kitchen pretending you are “only checking it.” That lie has been told in many kitchens.
This is also the kind of recipe that makes a home smell amazing. While the dough is rising, there is already that quiet bakery feeling in the room. Then it bakes, turns golden, and suddenly everyone becomes very interested in bread. Understandably.
The good news is that you do not need anything fancy here. Just basic pantry ingredients, a little patience, and a loaf pan. The dough is soft and pleasant to work with, the rise is beautiful, and the result is one of those homemade breads you end up making again because it actually delivers what it promises.
And yes, it really is very fluffy.
Why You’ll Love This Homemade Bread
This easy fluffy bread recipe is:
- soft and airy
- perfect for sandwiches or toast
- made with simple ingredients
- beautifully golden on top
- freezer-friendly and family-friendly
It is the kind of loaf that works for breakfast, lunch, snacks, and late-night buttered slices that were definitely not part of the plan.
Ingredients
- 4 cups all-purpose flour, plus more if needed
- 1 cup warm milk
- 1/2 cup warm water
- 1/4 cup sugar
- 2 1/4 teaspoons instant yeast or active dry yeast
- 1 teaspoon salt
- 1 large egg
- 1/4 cup unsalted butter, softened
For brushing
- 1 egg yolk mixed with 1 tablespoon milk, or a little melted butter
How to Make Fluffy Homemade Sandwich Bread
Step 1: Activate the yeast
In a large mixing bowl, combine the warm milk, warm water, sugar, and yeast. Stir gently and let it sit for about 5 to 10 minutes if using active dry yeast, until a light foam forms on top.
If you are using instant yeast, you can move to the next step more quickly, but a short rest still helps everything blend nicely.
The liquid should feel warm, not hot. If it is too hot, the yeast will give up before the bread even gets a chance.
Step 2: Add the wet ingredients
Add the egg and softened butter to the yeast mixture. Stir until mostly combined. The butter may look a little messy at first, and that is fine. Bread dough is allowed a slightly awkward beginning.
Step 3: Add the dry ingredients
Add the flour and salt gradually, mixing as you go. Once the dough starts coming together, use your hands or a mixer with a dough hook to knead it until smooth.
Knead for about 8 to 10 minutes by hand, or 6 to 7 minutes with a mixer. The dough should become soft, elastic, and slightly tacky, but not overly sticky.
If it feels too wet, add a little extra flour one tablespoon at a time. Try not to add too much. Soft dough is part of the secret to soft bread.
Step 4: First rise
Shape the dough into a ball and place it in a lightly greased bowl. Cover it with a towel or plastic wrap and let it rise in a warm place for about 1 to 1 1/2 hours, or until doubled in size.
This is where the magic starts looking serious.
If your kitchen is cold, place the bowl somewhere gently warm, like inside an unheated oven with the light on.
Step 5: Shape the loaf
Once the dough has doubled, gently punch it down to release the air. Turn it out onto a lightly floured surface and flatten it into a rectangle.
Roll it up tightly into a loaf shape, pinching the seam closed at the bottom.
Place the dough seam-side down into a greased loaf pan.
Step 6: Second rise
Cover the loaf loosely and let it rise again for about 35 to 45 minutes, or until puffy and risen above the edge of the pan.
This second rise is what helps give you that high, fluffy loaf. Do not rush it.
At this point, the dough usually looks very pleased with itself.
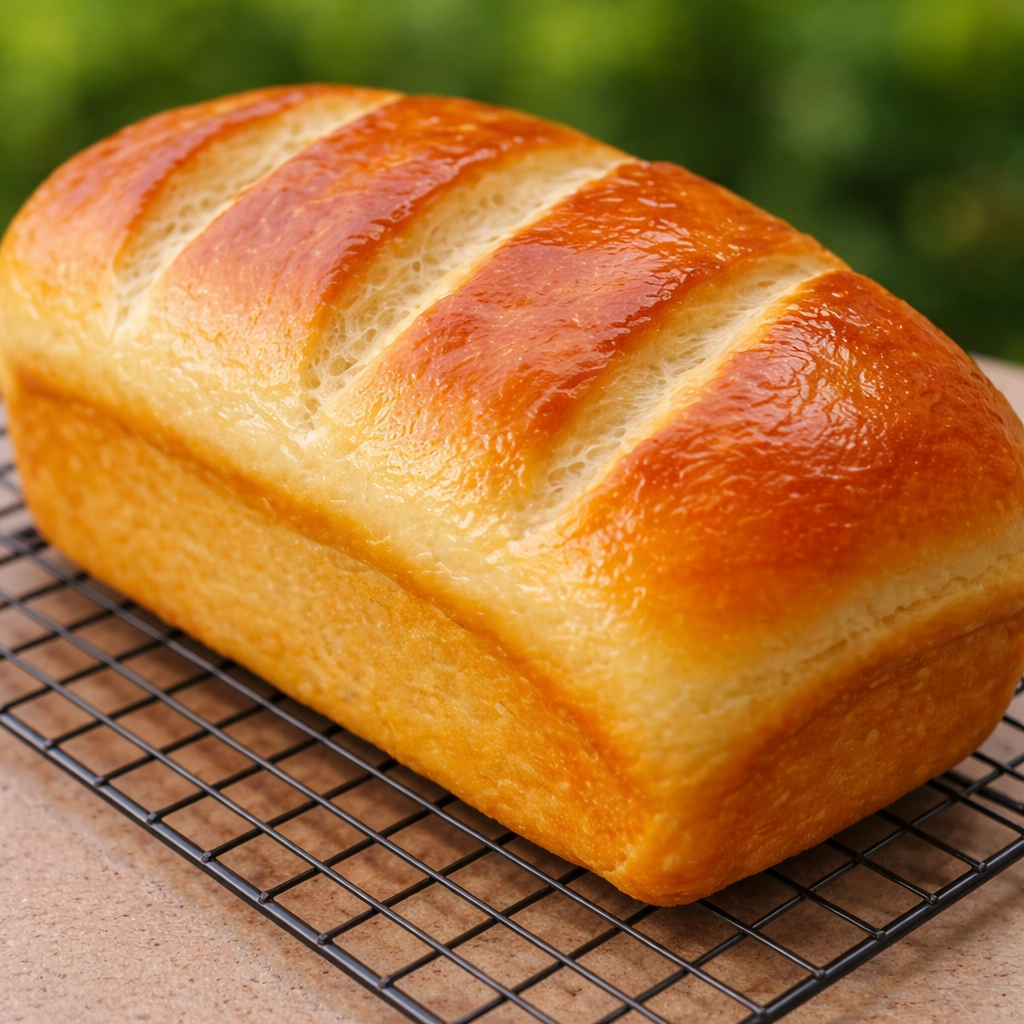
Step 7: Score and brush
Preheat your oven to 350°F (175°C).
If you like the classic look, use a sharp knife to make 3 or 4 shallow slashes across the top of the loaf.
Brush the top gently with the egg yolk and milk mixture, or melted butter. This gives the loaf that shiny golden finish.
Step 8: Bake
Bake for 28 to 35 minutes, or until the loaf is deep golden brown on top and sounds slightly hollow when tapped.
If the top browns too quickly, cover it loosely with foil for the last part of baking.
The smell at this point is outrageous in the best way.
Step 9: Cool
Remove the bread from the oven and let it rest in the pan for about 5 minutes.
Then transfer it to a wire rack to cool completely before slicing.
Yes, waiting is hard. Yes, slicing too early can make the inside gummy. Life is full of difficult moments.
Tips for the Best Fluffy Bread
Use warm milk and water, not hot.
Do not overload the dough with flour. A softer dough gives you a softer loaf.
Let both rises happen fully. Bread that is rushed tends to be less fluffy.
Brush with butter after baking if you want an even softer crust.
A serrated knife works best for slicing once cooled.
Ways to Use This Bread
This loaf is perfect for:
- breakfast toast
- grilled cheese
- sandwiches
- French toast
- garlic bread
- simple butter-and-jam situations that somehow become a whole event
It also freezes very well. Slice it first, then freeze so you can pull out pieces as needed.
Storage
Keep the bread tightly wrapped or in an airtight bag at room temperature for up to 3 days.
For longer storage, freeze it for up to 2 months.
If it starts getting slightly less soft after a day or two, toast fixes many things.
Final Thoughts
This Fluffy Homemade Sandwich Bread is one of those recipes that makes you feel unreasonably proud in the nicest way. It rises beautifully, bakes into a glossy golden loaf, and slices into soft, tender bread that is honestly hard to stop eating.
It is simple, comforting, and worth the little bit of time it takes. Once you make a loaf like this at home, the idea of fresh warm bread sitting on your counter starts sounding less like a rare occasion and more like a very smart habit.