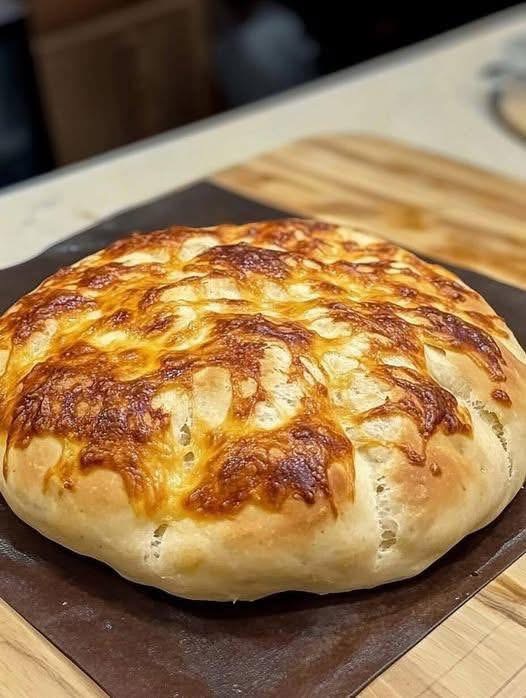
Of course! No-knead cheesy bread is a miracle of home baking. It requires minimal effort but yields an incredibly impressive, delicious loaf with a crackling crust, an airy, holey interior, and pockets of melted, savory cheese.
Here is a classic, foolproof recipe.
—
The Spirit of the Dish
The “no-knead” method, popularized by Jim Lahey, uses a very wet dough and a long, slow fermentation (rising time) to develop gluten and incredible flavor without any laborious kneading. Adding cheese to this formula creates a decadent, pull-apart bread that feels artisan but is deceptively simple to make.
—
No-Knead Cheesy Bread
This recipe makes one stunning 8-inch round loaf.
Ingredients:
· 3 cups (360g) all-purpose flour (bread flour works even better for a chewier crust)
· 1 ½ teaspoons kosher salt (or 1 tsp table salt)
· ¼ teaspoon instant or active dry yeast
· 1 ½ cups (350ml) warm water (about 100-110°F / 38-43°C)
· 1 ½ cups (6 oz / 170g) shredded cheese (see note below)
· Optional Add-Ins: 2 cloves minced garlic, 1 tbsp fresh chopped rosemary, ½ tsp black pepper, or a pinch of red pepper flakes.
Cheese Note: A mix of cheeses is best for flavor and meltiness. A classic combo is sharp cheddar for flavor and mozzarella or monterey jack for stretch. Gruyère, Gouda, or Parmesan are also excellent choices. Avoid pre-shredded bagged cheese, as it contains anti-caking agents that can make the bread greasy.
—
Instructions:
1. Mix the Dough (5 min): In a large bowl, whisk together the flour, salt, and yeast. Pour in the warm water and use a wooden spoon or your hands to mix until a shaggy, sticky dough forms and there are no dry spots of flour. It will be messy and wet—that’s perfect!
2. Incorporate Cheese: Gently fold in the shredded cheese (and any optional add-ins) until evenly distributed throughout the dough.
3. First Rise (12-18 hours): Cover the bowl tightly with plastic wrap or a lid. Let it sit at room temperature (ideally around 70°F / 21°C) for 12 to 18 hours. The dough is ready when its surface is dotted with bubbles and it has more than doubled in size.
4. Shape the Loaf (5 min): Generously flour a work surface and your hands. The dough will be very sticky. Gently scrape the dough out onto the floured surface. With floured hands, gently fold the dough over onto itself a few times to form a rough ball. Don’t overwork it; you’re just creating tension, not kneading.
5. Second Rise (1-2 hours): Place a piece of parchment paper on a plate or small baking sheet and generously dust it with flour or cornmeal. Place the shaped dough ball, seam-side down, onto the parchment. Cover loosely with plastic wrap or a clean kitchen towel and let it rise for another 1 to 2 hours, until it has puffed up significantly.
6. Preheat: About 30 minutes before the second rise is done, place a 4 to 6-quart Dutch oven (with lid) into your oven. Preheat the oven to 450°F (230°C). The pot must be scorching hot.
7. Bake:
· Carefully remove the screaming hot Dutch oven from your oven. Remove the lid.
· Using the parchment paper as a sling, carefully lower the dough into the hot pot. You can score the top with a sharp knife or scissors for a more artistic look, but it’s not necessary.
· Cover with the lid and bake for 30 minutes.
· Remove the lid and continue baking for another 15-20 minutes, until the crust is a deep, golden brown and the internal temperature reads about 205-210°F (96-99°C).
8. Cool (The Hardest Part!): Use the parchment paper to lift the bread out of the pot and place it on a wire cooling rack. It will sound hollow when tapped. You MUST let it cool for at least 1 hour before slicing. Cutting into it too early will release steam and leave the interior gummy.
—
Tips for Perfect No-Knead Cheesy Bread:
· Plan Ahead: The long, slow rise is what develops the flavor, so you need to start this the day before you want to bake it.
· Dutch Oven is Key: The Dutch oven creates a steamy environment that mimics a professional baker’s oven. This steam is essential for achieving a crispy, crackly crust. If you don’t have one, you can use a similar-sized oven-safe pot with a tight-fitting lid.
· Don’t Fear the Stickiness: A wet dough is the secret to an open, airy crumb. Use plenty of flour on your hands and the work surface when shaping.
· Cheese Leakage: Some cheese might melt out and caramelize on the bottom of the pot. This is not a failure—it’s a delicious, cheesy bonus!
· Storage: Keep the leftover bread in a paper bag at room temperature for up to 2 days for the best crust. For longer storage, keep in a plastic bag (the crust will soften) or freeze whole slices to reheat later.
Enjoy your incredible, homemade, cheesy masterpiece! The wait is absolutely worth it.
